:::: MENU ::::

Thursday, October 4, 2018

Azure is a big cloud with lots of services, and for even the most experienced user it can be intimidating to know which service will best meet your needs. This blog post is intended to provide a short overview of the most common concepts and services .NET developers need get started and provide resources to help you learn more.

Key Concepts

Azure Account: Your Azure account is the credentials that you sign into Azure with (e.g. what you would use to log into the Azure Portal). If you to not yet have an Azure account, you can create one for free

Azure Subscription: A subscription is the billing plan that Azure resources are created inside. These can either be individual or managed by your company. Your account can be associated with multiple subscriptions. If this is the case, you need to make sure you are selecting the correct one when creating resources. For more info see understanding Azure accounts, subscriptions and billing. Did you know, if you have a Visual Studio Subscription you have monthly Azure credits just waiting to be activated?

Resource Group: Resource groups are one of the most fundamental primitives you'll deal with in Azure. At a high level, you can think of a resource group like a folder on your computer. Any resources or service you create in Azure will be stored in a resource group (just like when you save a file on your computer you choose where on disk it is saved).

Hosting: When you want code you've written to run in Azure, it needs to be hosted in a service that supports executing user provided code.

Managed Services: Azure provides many services where you provide data or information to Azure, and Azure's implementation takes the appropriate action. A common example of this is Azure Blob Storage, where you provide files, and Azure handles reading, writing, and persisting them for you.

Choosing a Hosting Option

Hosting in Azure can be divided into three main categories:

  • Infrastructure-as-a-Service (IaaS): With IaaS, you provision the VMs that you need, along with associated network and storage components. Then you deploy whatever software and applications you want onto those VMs. This model is the closest to a traditional on-premises environment, except that Microsoft manages the infrastructure. You still manage the individual VMs (e.g. deciding what operating system you want, install custom software, when to apply security updates, etc.).
  • Platform-as-a-Service (PaaS): Provides a managed hosting environment, where you can deploy your application without needing to manage VMs or networking resources. For example, instead of creating individual VMs, you specify an instance count, and the service will provision, configure, and manage the necessary resources. Azure App Service is an example of a PaaS service.
  • Functions-as-a-Service (FaaS): Often called "Serverless" computing, FaaS goes even further than PaaS in removing the need to worry about the hosting environment. Instead of creating compute instances and deploying code to those instances, you simply deploy your code, and the service automatically runs it. You don't need to administer the compute resources, the platform seamlessly scales your code up or down to whatever level necessary to handle the traffic and you pay only when your code is running. Azure Functions are a FaaS service.

In general, the further towards Serverless you can host your application, the more benefits you'll see from running in the cloud. Below is a short cheat sheet for getting started with three common hosting choices in Azure and when to choose them (for a more complete list see Overview of Azure compute options)

  • Azure App Service: If you are looking to host a web application or service we recommend you look at App Service first. To get started with App Service, see the ASP.NET Quickstart (instructions are applicable to ASP.NET, WCF, and ASP.NET Core apps).
  • Azure Functions: Azure Functions are great for event driven workflows. Examples include responding to Webhooks, processing items placed into Queues or Blob Storage, Timers, etc. To get started with Azure Functions see the Create your first function quickstart.
  • Azure Virtual Machines: If App Service doesn't meet your needs for hosting an existing application (e.g. you need to install custom software on the machine, or access operating system APIs that are not available in App Service's environment) Virtual Machines will be the easiest place to start. To get started with Virtual Machines see our Deploy an ASP.NET app to an Azure virtual machine tutorial(applies equally to WCF).

If you need more help deciding on which hosting/compute option is best for you, see the Decision tree for Azure compute services.

Choosing a Data Storage Service

Azure offers many services for storing your data depending on your needs. The most common data services for .NET developers are:

  • Azure SQL Database: If you are looking to migrate an application that is already using SQL Server to the cloud, then Azure SQL Database is a natural place to start. To get started see the Build an ASP.NET app in Azure with SQL Database tutorial.
  • Azure Cosmos DB: Is a modern database designed for the cloud. If you are looking to start a new application that doesn't yet have a specific database dependency, you should look at Azure Cosmos DB as a starting point. Cosmos DB is a good choice for new web, mobile, gaming, and IoT applications where automatic scale, predictable performance, fast response times, and the ability to query over schema-free data is important (common use cases for Azure Cosmos DB). To get started See build a .NET web app with Azure Cosmos DB quickstart
  • Blob Storage: Is optimized for storing and retrieving large binary objects (images, files, video and audio streams, large application data objects and documents, etc.). Object stores enable the management of extremely large amounts of unstructured data. To get started see the upload, download, and list blobs using .NET quickstart.

For more help deciding on which data storage service will best meet your needs, see choose the right data store.

Diagnosing Problems in the Cloud

Once you deploy your application to Azure, you'll likely run into cases where it worked locally but doesn't in Azure. Below are two good places to start:

  • Remote debug from Visual Studio: Most of the Azure compute services (including all three covered above) support remote debugging with Visual Studio and acquiring logs. To explore Visual Studio's capabilities for your application type, open the Cloud Explorer tool window (type "Cloud Explorer" into Visual Studio's Quicklaunch toolbar (in the top right corner), and locate your application in the tree. For details see diagnosing errors in your cloud apps.
  • Enable Application Insights: Application Insights is a complete application performance monitoring (APM) solution that captures diagnostic data, telemetry, and performance data from the application automatically. To get started collecting diagnostic data for your app, see start monitoring your ASP.NET Web Application with Azure Application Insights.

Conclusion and Resources

The above is a short list of what to look at when you're first starting with Azure. If you are interested in learning more here are a few resources:

As always, we want to see you successful, so if you run into any issues, let me know in the comment section below, or via Twitter and I'll do my best to get your question answered.
Blazor 0.6.0 is now available! This release includes new features for authoring templated components and enables using server-side Blazor with the Azure SignalR Service. We're also excited to announce our plans to ship the server-side Blazor model as Razor Components in .NET Core 3.0!

Here's what's new in the Blazor 0.6.0 release:

  • Templated components
    • Define components with one or more template parameters
    • Specify template arguments using child elements
    • Generic typed components with type inference
    • Razor templates
  • Refactored server-side Blazor startup code to support the Azure SignalR Service

A full list of the changes in this release can be found in the Blazor 0.6.0 release notes.

Get Blazor 0.6.0

Install the following:

  1. .NET Core 2.1 SDK (2.1.402 or later).
  2. Visual Studio 2017 (15.8 or later) with the ASP.NET and web development workload selected.
  3. The latest Blazor Language Services extension from the Visual Studio Marketplace.
  4. The Blazor templates on the command-line:

    dotnet new -i Microsoft.AspNetCore.Blazor.Templates  

You can find getting started instructions, docs, and tutorials for Blazor at https://blazor.net.

Upgrade an existing project to Blazor 0.6.0

To upgrade a Blazor 0.5.x project to 0.6.0:

  • Install the prerequisites listed above.
  • Update the Blazor package and .NET CLI tool references to 0.6.0. The upgraded Blazor project file should look like this:

    <Project Sdk="Microsoft.NET.Sdk.Web">    <PropertyGroup>      <TargetFramework>netstandard2.0</TargetFramework>      <RunCommand>dotnet</RunCommand>      <RunArguments>blazor serve</RunArguments>      <LangVersion>7.3</LangVersion>  </PropertyGroup>    <ItemGroup>      <PackageReference Include="Microsoft.AspNetCore.Blazor.Browser" Version="0.6.0" />      <PackageReference Include="Microsoft.AspNetCore.Blazor.Build" Version="0.6.0" />      <DotNetCliToolReference Include="Microsoft.AspNetCore.Blazor.Cli" Version="0.6.0" />  </ItemGroup>    </Project>  
  • If your project or solution has a global.json file from an earlier Blazor project template, we recommend removing it.

That's it! You're now ready to try out the latest Blazor features.

Templated components

Blazor 0.6.0 adds support for templated components. Templated components are components that accept one or more UI templates as parameters, which can then be used as part of the component's rendering logic. Templated components allow you to author higher-level components that are more reusable than what was possible before. For example, a list view component could allow the user to specify a template for rending items in the list, or a grid component could allow the user to specify templates for the grid header and for each row.

Template parameters

A templated component is defined by specifying one or more component parameters of type RenderFragment or RenderFragment<T>. A render fragment represents a segment of UI that is rendered by the component. A render fragment optionally take a parameter that can be specified when the render fragment is invoked.

TemplatedTable.cshtml

@typeparam TItem    <table>      <thead>          <tr>@TableHeader</tr>      </thead>      <tbody>      @foreach (var item in Items)      {          <tr>@RowTemplate(item)</tr>      }      </tbody>      <tfoot>          <tr>@TableFooter</tr>      </tfoot>  </table>    @functions {      [Parameter] RenderFragment TableHeader { get; set; }      [Parameter] RenderFragment<TItem> RowTemplate { get; set; }      [Parameter] RenderFragment TableFooter { get; set; }      [Parameter] IReadOnlyList<TItem> Items { get; set; }  }  

When using a templated component, the template parameters can be specified using child elements that match the names of the parameters.

<TemplatedTable Items="@pets">      <TableHeader>          <th>ID</th>          <th>Name</th>          <th>Species</th>      </TableHeader>      <RowTemplate>          <td>@context.PetId</td>          <td>@context.Name</td>          <td>@context.Species</td>      </RowTemplate>  </TemplatedTable>  

Template context parameters

Component arguments of type RenderFragment<T> passed as elements have an implicit parameter named context, but you can change the parameter name using the Context attribute on the child element.

<TemplatedTable Items="@pets">      <TableHeader>          <th>ID</th>          <th>Name</th>          <th>Species</th>      </TableHeader>      <RowTemplate Context="pet">          <td>@pet.PetId</td>          <td>@pet.Name</td>          <td>@pet.Species</td>      </RowTemplate>  </TemplatedTable>  

Alternatively, you can specify the Context attribute on the component element (e.g., <TemplatedTable Context="pet">). The specified Context attribute applies to all specified template parameters. This can be useful when you want to specify the content parameter name for implicit child content (without any wrapping child element).

Generic-typed components

Templated components are often generically typed. For example, a generic ListView component could be used to render IEnumerable<T>values. To define a generic component use the new @typeparam directive to specify type parameters.

GenericComponent.cshtml

@typeparam TItem    @foreach (var item in Items)  {      @ItemTemplate(item)  }    @functions {      [Parameter] RenderFragment<TItem> ItemTemplate { get; set; }      [Parameter] IReadOnlyList<TItem> Items { get; set; }  }  

When using generic-typed components the type parameter will be inferred if possible. Otherwise, it must be explicitly specified using an attribute that matches the name of the type parameter:

<GenericComponent Items="@pets" TItem="Pet">      ...  </GenericComponent>  

Razor templates

Render fragments can be defined using Razor template syntax. Razor templates are a way to define a UI snippet. They look like the following:

@<tag>...<tag>  

You can now use Razor templates to define RenderFragment and RenderFragment<T> values like this:

@{       RenderFragment template = @<p>The time is @DateTime.Now.</p>;      RenderFragment<Pet> petTemplate = (pet) => @<p>Your pet's name is @pet.Name.</p>  }  

Render fragments defined using Razor templates can be passed as arguments to templated components or rendered directly. For example, you can render the previous templates directly like this:

@template    @petTemplate(new Pet { Name = "Fido" })  

Use server-side Blazor with the Azure SignalR Service

In the previous Blazor release we added support for running Blazor on the server where UI interactions and DOM updates are handled over a SignalR connection. In this release we refactored the server-side Blazor support to enable using server-side Blazor with the Azure SignalR Service. The Azure SignalR Service handles connection scale out for SignalR based apps, scaling up to handle thousands of persistent connections so that you don't have to.

To use the Azure SignalR Service with a server-side Blazor application:

  1. Create a new server-side Blazor app.

    dotnet new blazorserverside -o BlazorServerSideApp1  
  2. Add the Azure SignalR Server SDK to the server project.

    dotnet add BlazorServerSideApp1/BlazorServerSideApp1.Server package Microsoft.Azure.SignalR  
  3. Create an Azure SignalR Service resource for your app and copy the primary connection string.

  4. Add a UserSecretsId property to the BlazorServerSideApp1.Server.csproj project file.

    <PropertyGroup>      <UserSecretsId>BlazorServerSideApp1.Server.UserSecretsId</UserSecretsId>  <PropertyGroup>  
  5. Configure the connection string as a user secret for your app.

    dotnet user-secret -p BlazorServerSideApp1/BlazorServerSideApp1.Server set Azure:SignalR:ConnectionString <Your-Connection-String>  

    NOTE: When deploying the app you'll need to configure the Azure SignalR Service connection string in the target environment. For example, in Azure App Service configure the connection string using an app setting.

  6. In the Startup class for the server project, replace the call to app.UseServerSideBlazor<App.Startup>() with the following code:

    app.UseAzureSignalR(route => route.MapHub<BlazorHub>(BlazorHub.DefaultPath));  app.UseBlazor<App.Startup>();  
  7. Run the app.

    If you look at the network trace for the app in the browser dev tools you see that the SignalR traffic is now being routed through the Azure SignalR Service. Congratulations!

Razor Components to ship with ASP.NET Core in .NET Core 3.0

We announced last month at .NET Conf that we've decided to move forward with shipping the Blazor server-side model as part of ASP.NET Core in .NET Core 3.0. About half of Blazor users have indicated they would use the Blazor server-side model, and shipping it in .NET Core 3.0 will make it available for production use. As part of integrating the Blazor component model into the ASP.NET Core we've decided to give it a new name to differentiate it from the ability to run .NET in the browser: Razor Components. We are now working towards shipping Razor Components and the editing in .NET Core 3.0. This includes integrating Razor Components into ASP.NET Core so that it can be used from MVC. We expect to have a preview of this support early next year after the ASP.NET Core 2.2 release has wrapped up.

Our primary goal remains to ship support for running Blazor client-side in the browser. Work on running Blazor client-side on WebAssembly will continue in parallel with the Razor Components work, although it will remain experimental for a while longer while we work through the issues of running .NET on WebAssembly. We will however keep the component model the same regardless of whether you are running on the server or the client. You can switch your Blazor app to run on the client or the server by changing a single line of code. See the Blazor .NET Conf talk to see this in action and to learn more about our plans for Razor Components:

More

Friday, September 28, 2018

A quick tip to save you a little frustration.

As new ASP.NET Core releases drop at regular intervals, you may find when you upgrade your app that everything works beautifully on your machine but then blows up spectacularly when you upload it to Azure.

You'll start seeing 500 errors about bad gateways and your app fails to start.

This is often because the version of ASP.NET core you're targeting hasn't been deployed to Azure yet.

Good news, you can easily check this for yourself.

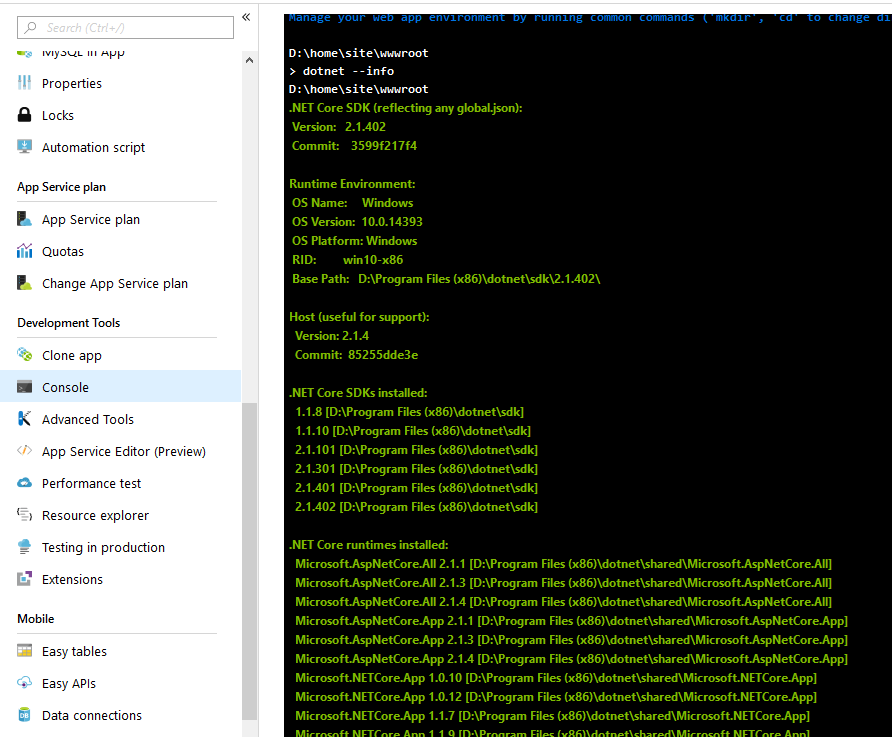
Head on over to your app service in the Azure portal, find the Console option in the left-hand menu.

Type dotnet --info and behold, a handy list of precisely which versions of ASP.NET Core are available to your app.