:::: MENU ::::

Thursday, February 22, 2018

In an earlier column I decide to look at one of the more interesting new features in ASP.NET Core: view components. View components look very like a mini-Controller class and View except that you invoke view components from a View in order to add HTML to the View. Effectively, they bundle business logic and UI into a single reusable package.

In that previous article, I showed how to create the class and View that make up a view component. In this article, I'll show how to use that view component both from a View and from within an Action method. I'll also walk through how to share a view component among multiple projects.

Invoking Your View Component
In a View, you can invoke a view component one of two ways: use a View's Component property or add a Tag Helper to the View.

For my money, the simplest method is to simply call the InvokeAsync method from the View's Component property, passing the name of your view component and its parameters. You must use the await keyword here to ensure that your Task object is resolved before your View finishes processing. If you omit the await keyword Razor will shove the string representation of the Task object returned by the InvokeAsync method into your page.

So, to call my CustomerAddress component passing A123 as the customer id, I'd use this code in a standard View:

@await Component.InvokeAsync("CustomerAddress", "A123")  

The only real downside to this method is that you don't get any IntelliSense support for entering the view component's name or parameters.

Invoking IntelliSense for View Components
If you'd prefer getting some IntelliSense support, then you'll want to use a Tag Helper to invoke your view component. With a Tag Helper, you add a tag to your View that shares your view component's name. The name for that tag must be your view component's name converted to lowercase and with hyphens before any uppercase letters (what's called kebob style). The tag name also needs the prefix vc: added to it. A view component called CustomerAddress class, therefore, is represented by a tag called vc:customer-address.


Any parameters that you want to pass to the InvokeAsync method must be provided through attributes on your new tag. The attribute name must match the parameter name, again converted to kebob format. To invoke my CustomerAddress view component as a Tag Helper, passing A123 to the CustomerId parameter, I'd add an element like this to a View:

<vc:customer-address customer-id="A123" />  

This will only work, however, if you've told your project about your view component through an addTagHelper directive, even if your view component is in the same project as the View that's using it. You can put that in the Views using your tag or add it to the _ViewImports.cshtml file in your project's Views folder to use your view component in any View. The addTagHelper directive accepts two parameters: the name of your view component with or without the wildcard character (*), and the view component's namespace. An addTagHelper in the _ViewImports file like the following example lets you use any Tag Helper in the CustomerManagement namespace in any View:

@using SalesOrder  @addTagHelper *, Microsoft.AspNetCore.Mvc.TagHelpers  @addTagHelper *, CustomerManagement  

With the addTagHelper in place, IntelliSense will, in a View, prompt you through typing in the tag name and providing the parameter attributes.

View Components in Controller Methods
As a bonus, you can also invoke view components in Action methods. Typically, you'll want to do this in Action methods that return HTML to JSON calls. The Controller class's ViewComponent helper accepts the name of your view component and an anonymous object. The names of the properties on your anonymous object must match the names of your InvokeAsync method's parameters. This example invokes the CustomerAddress view component, passing A123 to a parameter called CustomerId:

public IActionResult Index() {    return ViewComponent("CustomerAddress", new { CustomerId = "A123"});  }  

Rather than passing the name of your view component, you can pass its Type object, giving you some IntelliSense support, as in this example:

return ViewComponent(typeof(CustomerAddressViewComponent), new { CustomerId = "A123"});  

You must use the actual name of your view component class with this syntax. If you've used the ViewComponent attribute to name your view component (as I showed in my previous article), then you must use the name of the class here.

Sharing Across Projects
Not only can you reuse a view component within a single project, you can share a view component's class across multiple projects (but only the view component's class file, not its related View). It's the responsibility of the project using the view component to provide a View in one of the appropriate folders.

To support this, instead of defining your view component in an ASP.NET Core project, define the class in a Class Library project. Your Class Library project will need some ASP.NET Core libraries to support the ASP.NET Core classes and interfaces used in your view component. For the case study that I used in writing this article, I added the Microsoft.AspNetCore.All NuGet package to my Class Library project, which is probably more libraries than I needed.

To use your view component class in an ASP.NET Core project, first add a reference to the Class Library containing your view component. After that, you can just use the Component.InvokeAsync method in your Views or Action methods. If you want to use the Tag Helper syntax in your Views, you'll also need to add a addTagHelper directive that references your Class Library's namespace.

Really, my only complaint with view components is that they don't make quite as tidy a package as Web Parts did in the original version of ASP.NET. On the other hand, this is the first piece of ASP.NET technology that supports any kind of sharing across projects. Since that sharing improves consistency and reduces my workload, I'm a happy camper.

More
Saturday, February 17, 2018

In this column, I'm going to take a look at the next version of the .NET Framework's Web application development platform: ASP.NET Core. One of the more useful new features in ASP.NET Core is the addition of view components, which, in many ways, hark back to ASP.NET Web Parts. Like Web Parts, view components bundle up both logic and UI to create a package you can reuse throughout your ASP.NET Core application. With view components, you can also share the business logic component among multiple ASP.NET Core projects (something I'll discuss in a later column).

Of course, ASP.NET MVC also has Partial Views for creating reusable UI components. You could even integrate business logic into Partial Views though it was … difficult (but not impossible). View components, however, mimic the Controller/Action Method/View structure of an ASP.NET application, making combining UI and business logic a more natural fit with the structure of your ASP.NET Core application.

Caveats: To increase my chances of success when experimenting with this new technology, I downloaded the .NET Core 2.0 SDK and used Visual Studio 2017 to build my case study (I got a free copy of Visual Studio 2017 through the MVP Reconnect program). When I created my project, in the New ASP.NET Core Web Application dialog that appears after I selected my project template, I made sure that the framework box at the top of the dialog was set to .NET Core 2.0. I then added a Controller to my project, which caused Visual Studio to give me the option of picking the Full Dependencies option that adds every NuGet package Microsoft considers relevant to creating a Web application to my project -- and I took it. I also used NuGet Manager to add all of the AspNetCore Razor packages and the Microsoft.AspNetCore.Mvc.ViewFeatures package. Finally, after all that, I used NuGet Manager to update all my packages to the latest version.


Creating a View Component
A standard ASP.NET MVC page involves processing by both a Controller class and a View. Similarly, a view component involves processing by both a view component class and a View. The view component class file can be put in any folder you want -- for this case study, I've put mine in the Models folder. This class must inherit from the ViewComponent class.

You have two choices for flagging your class to ASP.NET Core as a view component. You can give your class a name and append the name with "ViewComponent" or you can decorate your class with the ViewComponent attribute, setting your view component's name through the attribute's Name property. Effectively, that means (from ASP.NET Core's point of view) these declarations are identical:

public class CustomerAddressViewComponent: ViewComponent  { }    [ViewComponent(Name = "CustomerAddress")]  public class AddressManager: ViewComponent  {}  

While your view component class file can go anywhere you want, the View used by your view component must be nested through the following folders:

  • The Views folder
  • Either a Controller folder or the Shared folder
  • A folder called Components
  • And, finally, a folder with a name that matches your view component's name

Since the point of a view component is to create something you can use in multiple places in your application, it makes the most sense to put your view component in the Views folder's Shared folder. However, if you have a view component that you only intend to use from one Controller you could put the View inside one of your View\ folders.

So, assuming I'm creating a view component called CustomerAddress that will be used from multiple controllers, I'd put its View in the /Views/Shared/Components/CustomerAddress folder. The name of the View is up to you, but if you don't want to explicitly use the View name in your code, you should call the View "Default." Currently only C# is supported for ASP.NET applications, so I end up with a View whose full pathname is /Views/Shared/Components/CustomerAddress/Default.cshtml. By the way, if you put the View in the wrong folder, at runtime you'll get the usual View error message that details all the places that ASP.NET looked in for your View. Inside a View you use the same Razor code as you use in any other View.

Adding Business Logic
Now that you've created your view component's class and View, it's just a matter of adding methods to your class and putting Razor markup in your View.

In your class, you're allowed one method and it must:

  • Have the name InvokeAsync
  • Return a Task object typed to IViewComponentResult
  • Be decorated with the async keyword
  • Accept a single parameter (of any type)

The async attribute will take care of wrapping whatever object you return from your InvokeAsync method inside a Task object. Currently, the only method built into the base ViewComponent class that returns an IViewComponentResult object is the View method. That all means that a simple implementation of an InvokeAsync method that returns an Address object would look like this:

public async Task InvokeAsync(string CustomerId) {    Address addr;    //...retrieve or build Address object for a specified customer    return View(addr);  }  

If you don't do any asynchronous processing in the InvokeAsync method (or if you do but don't use the await keyword with it) you'll get a warning message that your method will be run synchronously. Everything will still work, however.

Your InovkeAsync method will only accept a single parameter so, if you want to pass multiple values to the method, then you must pass those values through properties on an object or as members of a collection.

If you don't want to call your View "Default," then, as in a Controller's Action method, you can pass the name of the View you do want as the first parameter to the View method. Your ViewComponent can also have a constructor that accepts parameters. However, you'll need to count on ASP.NET Core's dependency injection engine to pass any parameters to that constructor.

Of course, creating a view component isn't much help if you can't invoke it, so I'll look at that in a later column.

More

Get it while it's hot!

You can find the latest release of Chocolatey GUI, version 0.16.0, in the useful place.

If you already have it installed, then simply do choco upgrade chocolateygui.

So what's new?

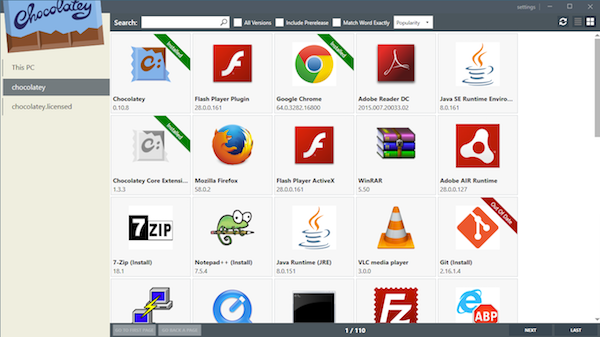
The biggest addition to this release of Chocolatey GUI is the tile view. You can now view packages in a tile format, which shows the icon of the underlying application, if there is one. You can see an example of this here:

Chocolatey GUI Tile View

This has been a much sought after feature, so we are very happy to have this finally land.

The other biggest feature in this release in the increased amount of languages that are supported by Chocolatey GUI. The supported languages now include:

  • Russian
  • French
  • Norwegian
  • Portuguese
  • Dutch
  • German
  • Swedish
  • Japanese
  • Spanish

A huge thank you has to go out to everyone who has joined the Transifex team to make this happen. If you are interested in helping out in translating Chocolatey GUI into another language, then please reach out, and we can get that included in the next release.

Release Notes

If you are interested in seeing the complete set of release notes for v0.16.0, then you can check them out here.


Saturday, February 10, 2018

If you are worked with ASP.NET Core 2.0 before you are probably aware that Visual Studio 2017 offers three basic project templates for creating ASP.NET Core 2.0 projects. They are Web Application (Razor Pages), Web Application (MVC), and Web API (see below). Interestingly Web Application project defaults to Razor Pages.

It is important for the beginners to be aware that although these are three different project templates, you can have all these development options - Razor Pages, MVC, and Web API - inside a single ASP.NET Core web application. These three technologies work seamlessly with each other and can happily coexist in a single project. To that end the remainder of this article explains how to setup an Empty project to use all of them together.

Quick Background

When Microsoft released ASP.NET Core 1.0 it had only MVC based development. For developing web applications developers used MVC and for building services developers resorted to Web API. In ASP.NET Core 2.0 they introduced Razor Pages. When you are doing MVC style development the focus is in the controllers. It's the controller that prepares model and sends it to a view.

In Razor Pages the focus shifts to UI or the web pages. Razor Pages allow you to develop page focused application where each page is a sort of independent unit in itself. Razor Pages don't have any controller at all. The UI goes inside a .cshtml file and the code goes inside a Page Model file. The Page Model class contains actions that deal with HTTP verbs such as GET and POST. If you developed web applications using ASP.NET Web Forms (code behind approach) you will find Razor Pages approach familiar.

Web API continue to use a controller based development.

In spite of these differences you can create a single project that makes use of these three development options. Core features such as model binding, DI, sessions, and cache can be utilized in Razor Pages as well as MVC in the same way.

Create an empty project

To begin our example, create a new project using Visual Studio 2017 based on the Empty project template. Once the project is created open its Startup file and write the following code to it :

public void ConfigureServices  (IServiceCollection services)  {      services.AddMvc();  }    public void Configure(  IApplicationBuilder app, IHostingEnvironment env)  {      app.UseDeveloperExceptionPage();      app.UseStaticFiles();      app.UseMvcWithDefaultRoute();  }

The ConfigureServices() calls AddMvc() to add the required services to DI container. The Configure() then calls UseMvcWithDefaultRoute() to add MVC middleware with default routing configured for us.

Setup for Razor Pages

Now that you have created the project, let's prepare it to use Razor Pages.

Begin by creating a folder named Pages under project's root folder. By default razor pages are stored inside Pages folder and can be accessed from the browser with Pages as their root. For example, if you have Index.cshtml housed inside Pages folder then it can be accessed as http://localhost:12345/Index

To add a razor page. right click on the Pages folder and then select Add > New Item.

Select Razor Page item and specify name as Index.cshtml. Click on the Add button. You will observe that two files - Index.cshtml and Index.cshtml.cs - get added to the Pages folder.

You can create further folder tree under Pages folder. According to the page's location its URL will change. For example, if you store Index2.cshtml under /Pages/MyFolder then you can access it at http://localhost:12345/MyFolder/Index2

Setup for MVC

Ok. Now let's prepare our project to use MVC.

Create three folders - Models, Views, and Controllers under project's root folder. Then create Home subfolder under Views folder.

Add a model class - Employee - inside Models folder. Add a controller - HomeController - under Controllers folder.

Also add Index.cshtml view under Views > Home folder.

Setup for Web API

Now add API folder under project's root. It's not required to isolate Web API in a separate folder, you can keep them in Controllers folder along with other MVC controllers. But for the sake of better organization I am storing the Web API inside the API folder.

Then add a Web API controller - ValuesController - inside the API folder. The values controller will contain Get() action that returns a couple of string values. Keep that intact since we need it for our testing.

To complete the project setup add Scripts folder under wwwroot and place jQuery library in it. We need jQuery to call the Web API.

At the end of all these steps your Solution Explorer should look like this :


Razor Page markup and code

So far so good. Now it's time to add a dash of markup and code to our application so that we can confirm its working.

Open Index.cshtml.cs PageModel class and write the following code to it :

public class IndexModel : PageModel  {      public string FullName { get; set; }        public void OnGet()      {          FullName = "Nancy Davolio";          ViewData["heading"] = "Welcome   to ASP.NET Core Razor Pages !!";      }  }

The IndexModel class contains FullName public property. The OnGet() action assigns a value to FullName and also stores a heading inside the ViewData dictionary.

Now open Index.cshtml and add the following code to it :

@page  @model RazorPagesMvcWebApi.Pages.IndexModel    <script src="~/Scripts/jquery-3.2.1.min.js"></script>    <script>        $(document).ready(function () {            var options = {};          options.url = "/api/values";          options.type = "GET";          options.dataType = "json";          options.success = function (data) {                data.forEach(function (element) {                  $("#result").append("<h3>" + element + "</h3>");              });          };          options.error = function () {              $("#msg").html("Error while calling the Web API!");          };          $.ajax(options);       });      </script>      <h1>@ViewData["heading"]</h1>    <h2>@Model.FullName</h2>    <h2>Result of Web API call</h2>    <div id="result"></div>

The above markup outputs the FullName and heading from the Model and ViewData respectively. Moreover, it contains jQuery Ajax code to call the Web API. Notice that the Web API can be accessed at /api/values. The return values from the Web API are displayed in the result <div> element at the bottom of the page. I won't go into details of this code since it's a typical piece of code for making Ajax calls.

MVC markup and code

Now open Employee class from the Models folder and add FullName property to it :

public class Employee  {      public string FullName { get; set; }  }

Then go to HomeController class and write the following code to the Index() action :

public IActionResult Index()  {      Employee emp = new Employee();      emp.FullName = "Nancy Davolio";      ViewData["heading"] = "Welcome to ASP.NET Core MVC !!";      return View(emp);  }

The above code prepares the Employee model object by setting its FullName property. It also stores the heading in ViewData dictionary. Finally, it passes the model to the Index view.

Finally, open the Index.cshtml from Views > Home folder and write the following code to it :

@model RazorPagesMvcWebApi.Models.Employee    <script src="~/Scripts/jquery-3.2.1.min.js"></script>    <script>      $(document).ready(function () {          var options = {};          options.url = "/api/values";          options.type = "GET";          options.dataType = "json";          options.success = function (data) {              data.forEach(function (element) {                  $("#result").append("<h3>" + element + "</h3>");              });          };          options.error = function () {              $("#msg").html("Error while calling the Web API!");          };          $.ajax(options);       });  </script>    <h1>@ViewData["heading"]</h1>    <h2>@ViewData["timestamp"]</h2>    <h2>@Model.FullName</h2>    <h2>Result of Web API call</h2>    <div id="result"></div>

This is basically the same that you wrote in the Index.cshtml razor page but uses Employee model class rather than a PageModel class.

Sample run of the application

Ok.  So, we have a razor page, an MVC controller, and a Web API controller housed in a single ASP.NET Core project. Let's see whether it works as expected.

Run the application and give hits to the following URLs:

http://localhost:12345/Index    http://localhost:12345/Home/Index

If all goes well your browser should look like (first URL) :

And like this (second URL) :

As you can see razor pages, MVC, and Web API are working happily in a single web application.

More

Razor Pages in ASP.NET Core allow you to build page focused web applications using simple page based programming model. If you worked with Razor Pages before you are probably aware that by default you can handle requests using methods such as OnGet(), OnPost(), OnPut(), and OnDelete(). This means a form POSTed to the server needs to be handled using only one action - OnPost(). At times, however, you need to have multiple actions to deal with the same HTTP verb. A common scenario is when you have multiple submit buttons on a form.

Consider the following example that shows such a form.

As you can see, the Index.cshtml page has three submit buttons housed inside a form. And you want to handle each button different. By default, clicking on any of these three buttons will trigger OnPost() action. How to wire three different handlers instead of the default handler? To accomplish this you need to use the asp-page-handler attribute of the tag helpers. Have a look at the following mark that shows the above form :

<form method="post">      <h2>What kind of yoga classes you are looking for?</h2>      <input type="submit"   value="Basic Yoga Postures"   asp-page-handler="YogaPostures" asp-route-sessioncount="20" />      <br />      <input type="submit"   value="Kriya and Meditation"   asp-page-handler="Meditation" asp-route-sessioncount="10" />      <br />      <input type="submit"   value="Restorative Yoga"   asp-page-handler="RestorativeYoga" asp-route-sessioncount="15" />  </form>

Notice the code shown in bold letters. The input elements have asp-page-handler attribute set to certain values. This attribute decides the action from the page model that will be handling the form submission. The asp-page-handler attribute basically emits formaction HTML attribute in the browser. Also notice that the input elements also have asp-route-sessioncount attribute. This attribute sets a route value that is then supplied to the corresponding handler method. Specifying asp-route-* is, of course, optional. Form fields are made available to the handler methods through model binding as usual (also see my earlier article here).

Ok. So far so good. Now it's time to write those handler actions as mentioned in the asp-page-handler attributes. Open the page model class (Index.cshtml.cs) and write the following actions into it :

public void OnPostYogaPostures(int sessionCount)  {      //do your work here        ViewData["message"] = $"Your request for   {sessionCount} sessions in Yoga Postures   is being processed.";  }    public void OnPostMeditation(int sessionCount)  {      //do your work here        ViewData["message"] = $"Your request for   {sessionCount} sessions in Kriya and Meditation   is being processed.";  }      public void OnPostRestorativeYoga(int sessionCount)  {      //do your work here        ViewData["message"] = $"Your request for   {sessionCount} sessions in Restorative Yoga   is being processed.";  }

Notice the action naming convention. Since we want to handle POST requests we prepend all the action names (asp-page-handler name) with "OnPost". Thus we have OnPostYogaPostures, OnPostMeditation, OnPostRestorativeYoga. Also notice that all the handlers have sessionCount parameter. This parameter will come from the asp-route-sessioncount attribute we assigned earlier.

Set a breakpoint in each of these methods and run the application. You will find that clicking on a button takes the control to the corresponding page handler.

 More

Long time ago I blogged about Authentication & Authorization in RazorPages which I introduced the authentication & authorization processes in Razor Pages, and after a while I wrote another blog post about Razor Pages Conventions which I showed you in some details how Razor Pages provide a convention-based to access control of the page(s) and folder(s).

One of the missing features that I notice - and requested by the folks - is Role-Based Authorization. AFAIK there's no direct way to support this feature yet using the Razor Pages Conventions.

But there 's a HACK if you need to support such feature by using AuthorizePage or AuthorizeFolder with the overload that accept a policy as string. Again you need to define your policy yourself and pass its name to above methods. Perhaps the easiest way to achieve this by using AddAuthorization options as the following:

services.AddAuthorization(options =>  {        options.AddPolicy("RequireAdministratorRole", policy => policy.RequireRole("Administrator"));  }); 

Seems this not the elegant way to add such feature, so that's why I decide to write a new blog post that explain how can we extend the PageConventionCollection to support Role-Based Authorization with few lines of code.

First of all let us create PageConventionCollectionExtensions class, with adding another overload for AuthorizeFolder and AuthorizePage that accepts roles as array of string.

public static PageConventionCollection AuthorizeFolder(this PageConventionCollection conventions, string folderPath, string[] roles)  {      if (conventions == null)      {          throw new ArgumentNullException(nameof(conventions));      }        if (string.IsNullOrEmpty(folderPath))      {          throw new ArgumentException("Argument cannot be null or empty.", nameof(folderPath));      }        var policy = new AuthorizationPolicyBuilder().          RequireRole(roles).Build();      var authorizeFilter = new AuthorizeFilter(policy);      conventions.AddPageApplicationModelConvention(folderPath, model => model.Filters.Add(authorizeFilter));      return conventions;  }

If you notice above that I used AuthorizationPolicyBuilder to create a new policy that accepts a set of role names using RequireRole function, after that I create an authorization filter using the created policy, which will be added to the Filters collection in page application model.

Then we can do the same thing with AuthorizePage extension method.

public static PageConventionCollection AuthorizePage(this PageConventionCollection conventions, string pageName, string[] roles)  {      if (conventions == null)      {          throw new ArgumentNullException(nameof(conventions));      }        if (string.IsNullOrEmpty(pageName))      {          throw new ArgumentException("Argument cannot be null or empty.", nameof(pageName));      }        var policy = new AuthorizationPolicyBuilder().          RequireRole(roles).Build();      var authorizeFilter = new AuthorizeFilter(policy);      conventions.AddPageApplicationModelConvention(pageName, model => model.Filters.Add(authorizeFilter));      return conventions;  }

Finally we can use the newly added methods like the other Razor Pages Conventions as the following:

services.AddMvc()      .AddRazorPagesOptions(options =>      {          options.Conventions.AuthorizePage("/Private", new [] { "Administrators" });          options.Conventions.AuthorizeFolder("/Account", new[] { "Administrators" });      });

That is it!! now you 're free to use Role-Based Authorization in Razor Pages with the same conventions that you know and love.

More